Tuesday, August 30, 2011

DIY Tuesday... Homemade Sugar Wax for Hair Removal

Recipe: Homemade Sugar Wax With Honey

Ingredients:
2 tsp brown sugar
1 tsp honey
1 tsp water
You’ll also need a knife or something flat to apply the wax and some cloth strips for peeling it off.

homemade sugar wax ingredients
1) Combine ingredients in a microwavable container. I used a Pyrex measuring cup. You could also use the stove instead of microwave, but you’d need a very tiny pan.

homemade sugar wax

2) Cook mixture in the microwave (or on the stove) until it bubbles and turns brown. This part was challenging. If you don’t cook the mixture long enough, it stays too soft and sticky to work. If you cook it too long, it turns into hard candy.  I experimented with two different batches until I got it right. I believe I cooked it for about 30 or 35 seconds.

3) Let cool. This is also important. You won’t know if you’ve cooked the wax long enough until it cools down. If it’s too thick, dilute it a little and try it out.

4) Brows, get ready for some waxing!


Thursday, August 25, 2011

The Gospel According to Girls...

Today we will start a new tradition...
If you watch How I Met Your Mother you've seen the "bro code" at the end of each episode.  Today we will start what we are calling "The Gospel According to Girls".  Hope you like it...


Photo courtesy of: http://winobee.blogspot.com/

The Gospel According to Girls... Numero Uno

•    Thou shalt produce, at a moment’s notice, Kleenex, chocolate, vodka, a lift, a spare room or a drop dead gorgeous outfit available for borrowing for any friend who suddenly has need of the aforementioned.  All of the above are to be delivered personally where possible, wrapped in TLC with a bow made up of listening.

Tuesday, August 23, 2011

DIY Tuesday... THE LONG + THE SHORT OF IT

THE LONG + THE SHORT OF IT


photos: justin coit + thebeautydepartment.com

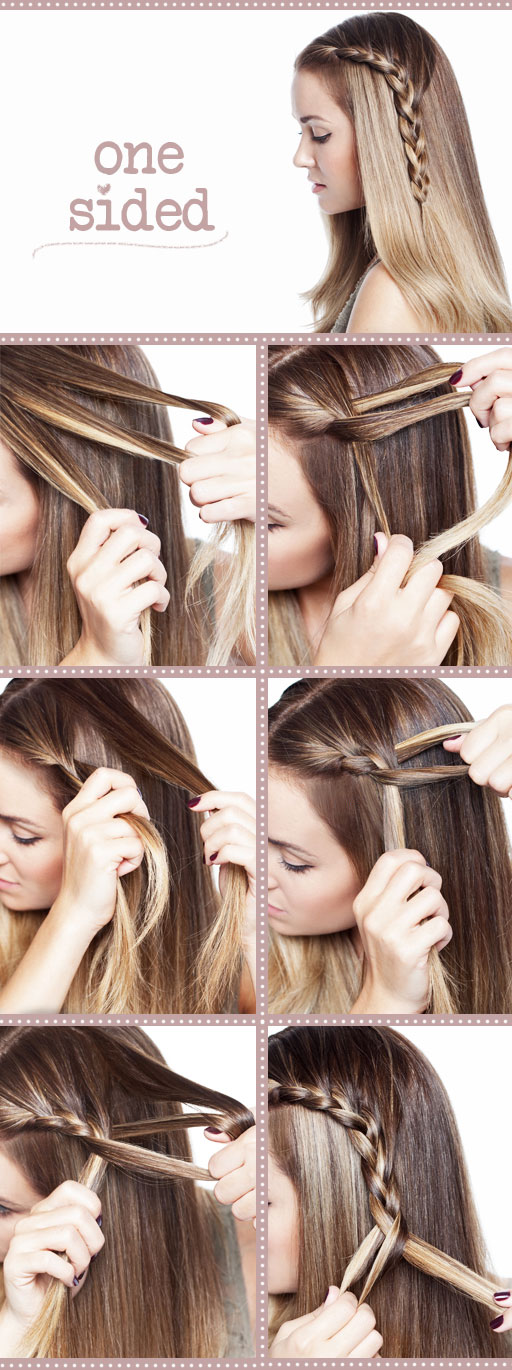
Check out this gem. It works on literally any hair type – short, long, curly, pin straight, anything! It’s so great for those mornings when you’re in a rush but need something to pull your look together. Think of it as a french braid, but you only add in new hair from one side (the top). Follow these steps + be patient! You’ll get it…
  • we like to part slightly off-center for this. on the heavier side, grab a section at your hairline. split it in three.
  • start it just like you would a regular french braid.
  • next add in a piece of hair from the top, still like a regular french braid.
  • now skip the part where you’d grab a new piece from the bottom + keep braiding instead.
  • then take another piece from the top + add it in.
  • continue with this pattern until you have 5-7 sections added in.
  • once you’re just past the ear, stop adding in new hair. Just do a regular braid + tie it off with a clear elastic like in the top picture.
(Technique taken from http://thebeautydepartment.com/ - a great site for DIY hairstyles)

Saturday, August 13, 2011

Dameron ~ Bergeron Wedding (April 30, 2011)


Our wedding was held at the beautiful 1927 Lake Lure Inn and Spa  http://www.lakelure.com/
Pictures taken by the amazing LishaMyersPhotograrphy http://www.lishamyers.com/blog

Friday, August 12, 2011

You think unibrows are bad???


GLAM CODE #1
Overplucked Eyebrows

Problem: Too thin, unflattering brows.

When you get a clear look at yourself or have been reprimanded by a friend or professional that your brows are too thin, step away from the mirror, put down the tweezers and start from scratch!

Solution: You need to let your eyebrows grow back in -- all of them.

This is one of the most difficult beauty dilemmas to address because it is so tempting to clean up all of the new hairs growing in, but you have to let them all grow in to really see which brow shape will best compliment your face.

Tuesday, August 9, 2011

"Ring of Rosies"


  • Start with a pair of scissors, a needle + thread, and small flowers.
  • [poke] carefully pierce a hole in the stem of the first flower.
  • [thread through] gently feed the second flower through the pierced hole.
  • [tie] secure the two flowers together by wrapping them with thread right where the two stems meet.
  • [again] do the exact same on the next stem.
  • [and again] feed the next flower through and wrap it with thread as well.
  • do that again and again and again until you have a chain!
  • [twist] use wire to add the more delicate flowers. the stems may be to thin to pierce and thread through. i use bead wire because it’s so thin, but you can also use floral wire. you can get bead wire at the craft store and floral wire at the flower markets.
  • [wear] i added ribbon to the back so it can be tied loosely, but you can also bobby pin it into your ‘do. this is a pretty sturdy way of doing a flower crown so you’re more than welcome to run through fields, forests and do all the cartwheels you want.
XOXO
The Glam Squad

Monday, August 8, 2011

Here comes the bride...

These pictures were taken at the beautiful King's Daughter's Inn in Chapel Hill, NC. 
It was an absolutely perfect setting for my bridals. 


Gorgeous pictures taken by the amazing LishaMyersPhotography


Saturday, August 6, 2011

Haaaaaaaave you met....

Riley, Jessica, and Jennifer aka the "Glam Squad".  Just a few Real Housewives of the Carolina's taking on the exciting adventure of owning a business. Hair, Make-up and Style is our love and passion and now we are ready to share that with everyone out there.

RILEY- She is a true Southern Belle that grew up in a small town in South Carolina. She still sends Thank You notes and gifts for the hostess. Riley has been styling dolls for years...A true Fashionista!

JENNIFER- She was born in Florida, but made her way to North Carolina when she was seven and has been breaking hearts since. She taught her sister years ago that you can do anything with hair as long as you have plenty of bobbie pins!

JESSICA- She was born and bred in small town North Carolina. "You can't make up my make up skillz" (quote from my 19 year old nephew).

We are excited to be on this journey of making your special day, "legend...wait for it...dary"!

WELCOME TO ALL DOLLED UP!

Monday, August 1, 2011

Stayed tuned for amazing wedding day looks...